Tag Archives: Yellow
Hey everyone!
It’s been a while ( and by a while I really mean months… Ooops) since my last post.
I really needed a break from everything! I have had a lot of stuff going on that in all honesty has been simultaneously boring and stressful! But I’m not going bore you all with the details!
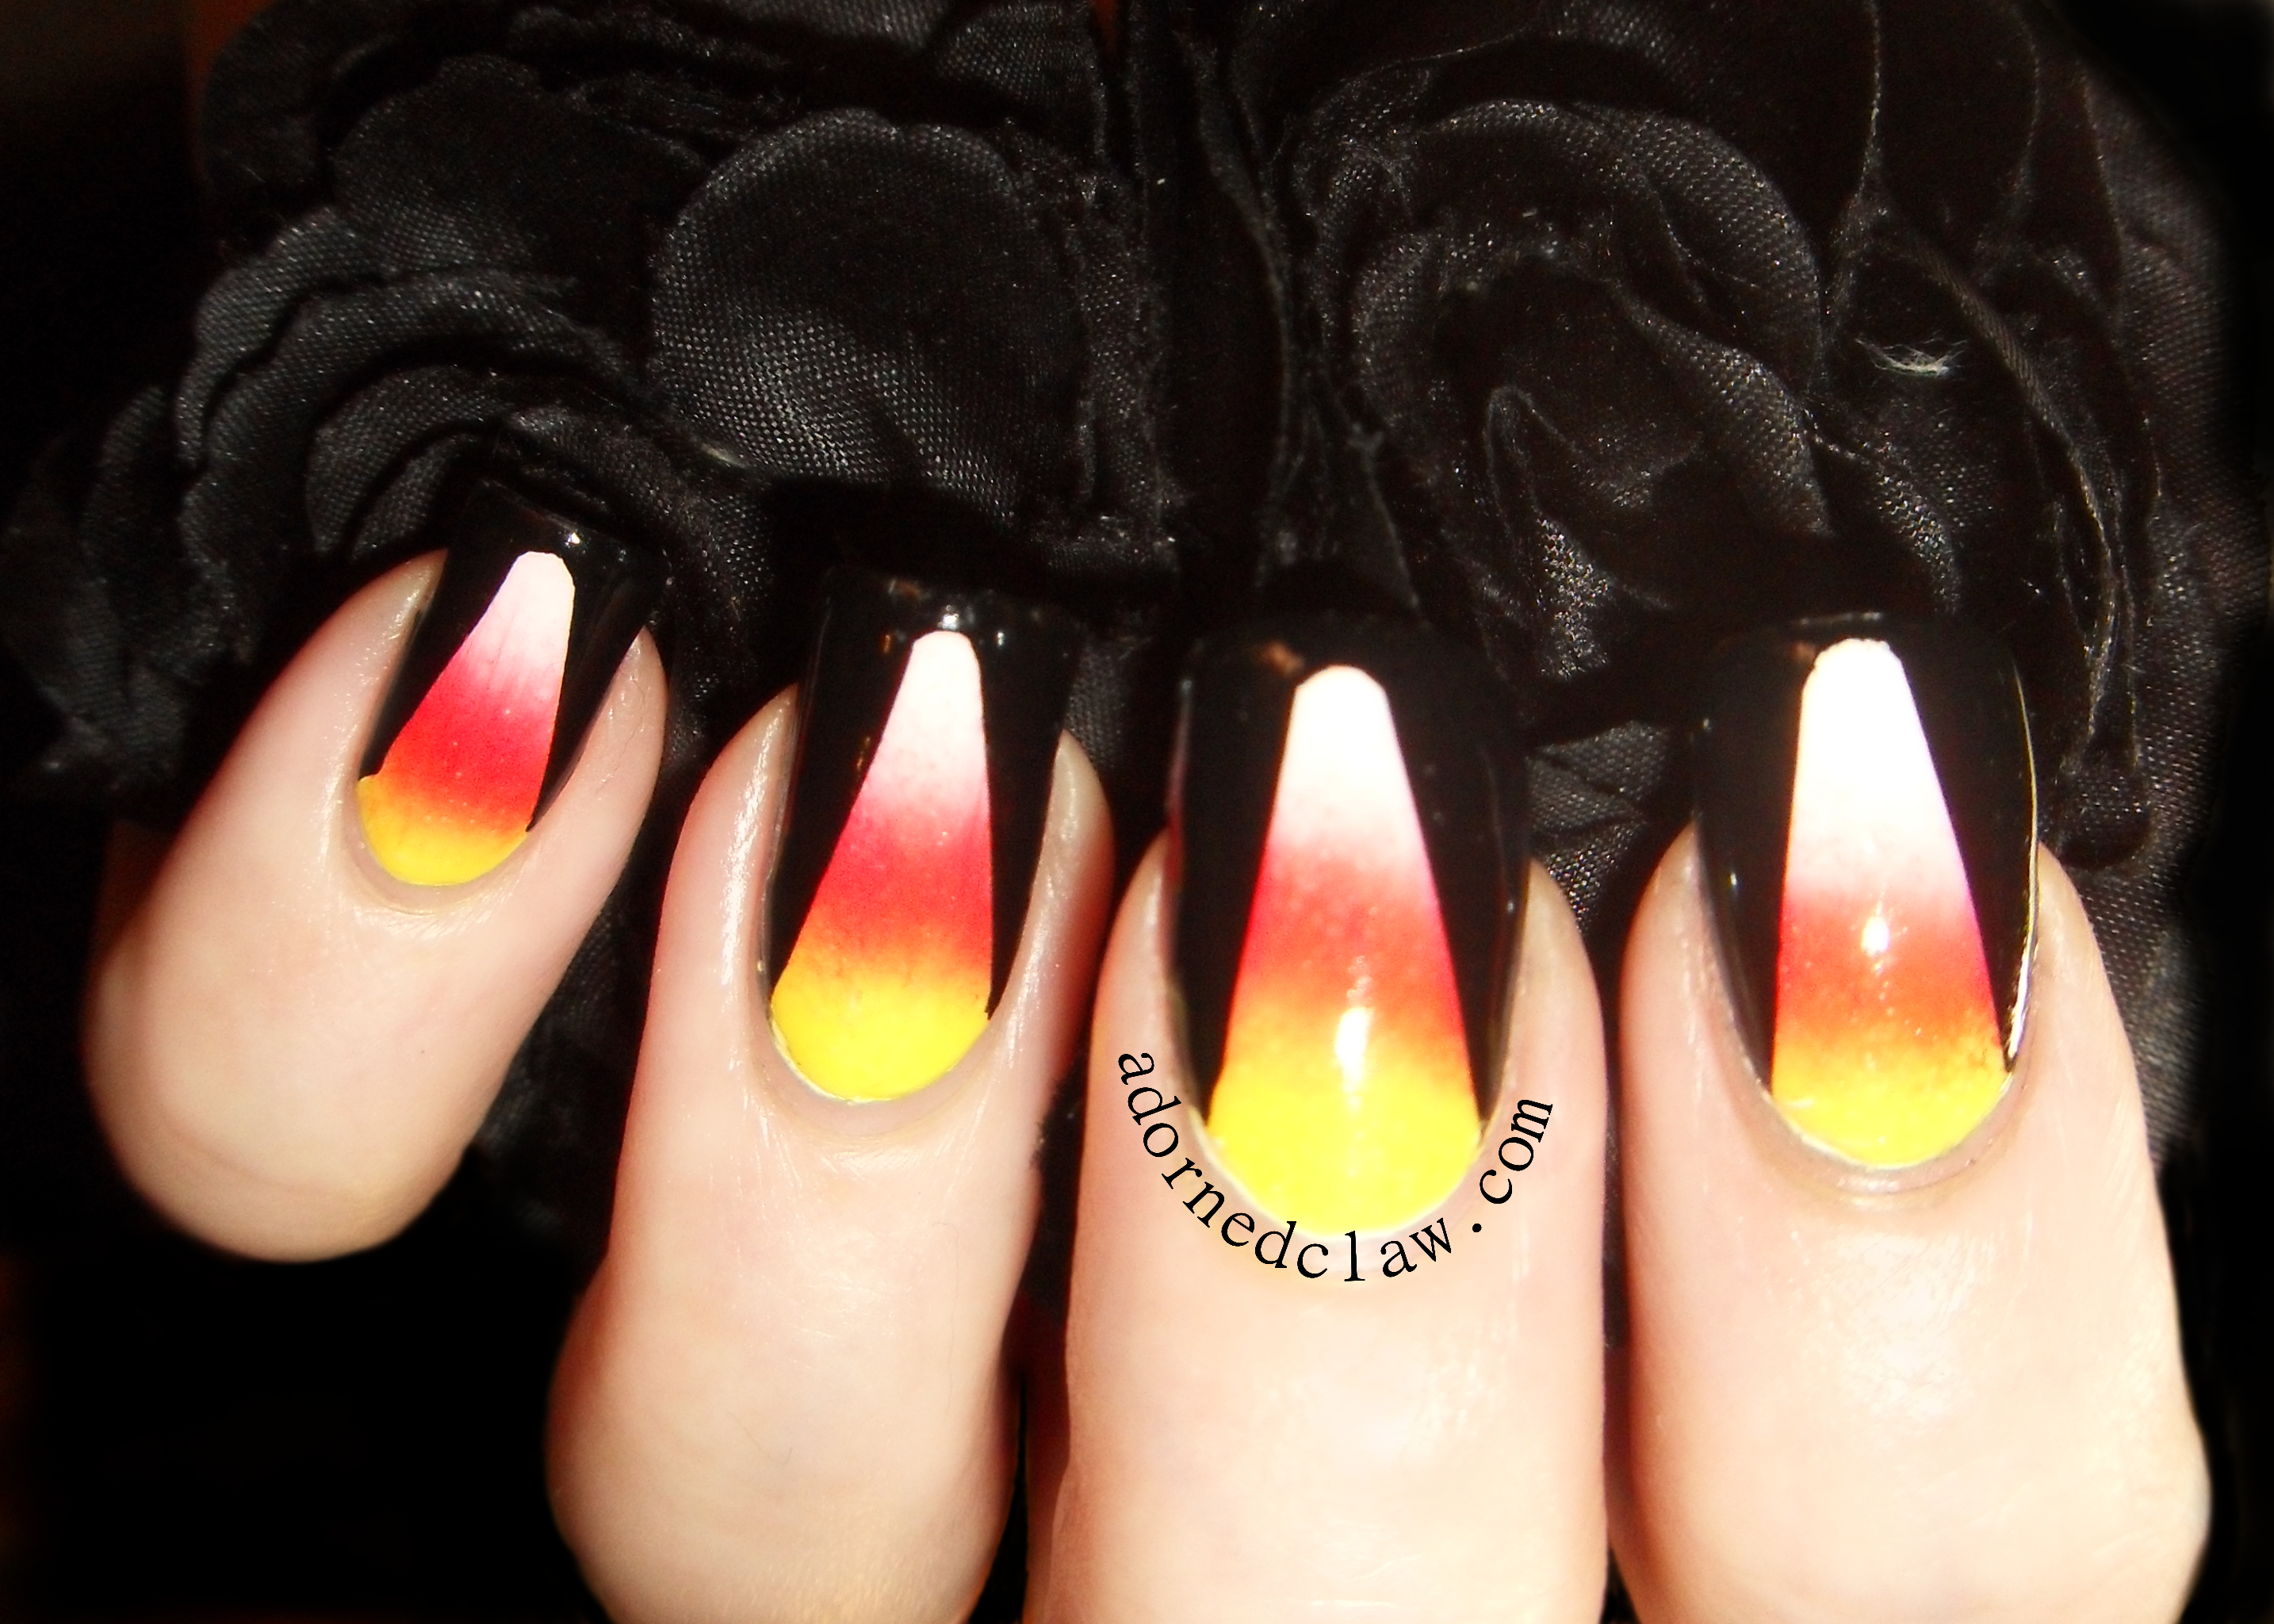
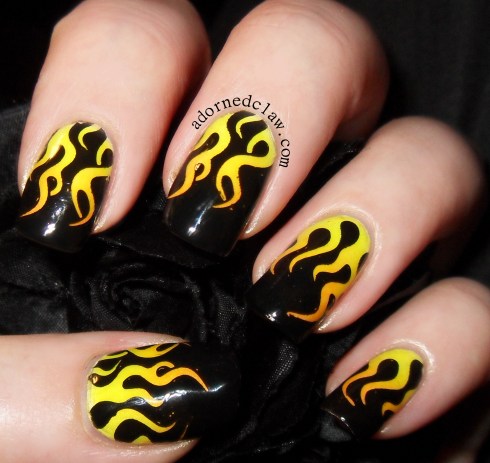
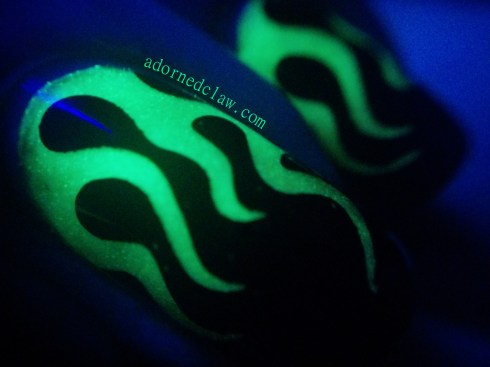
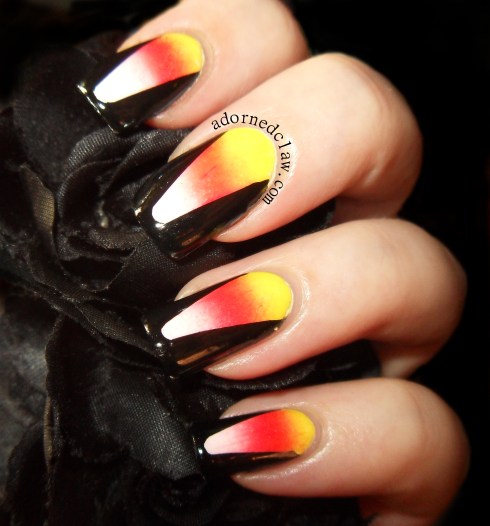
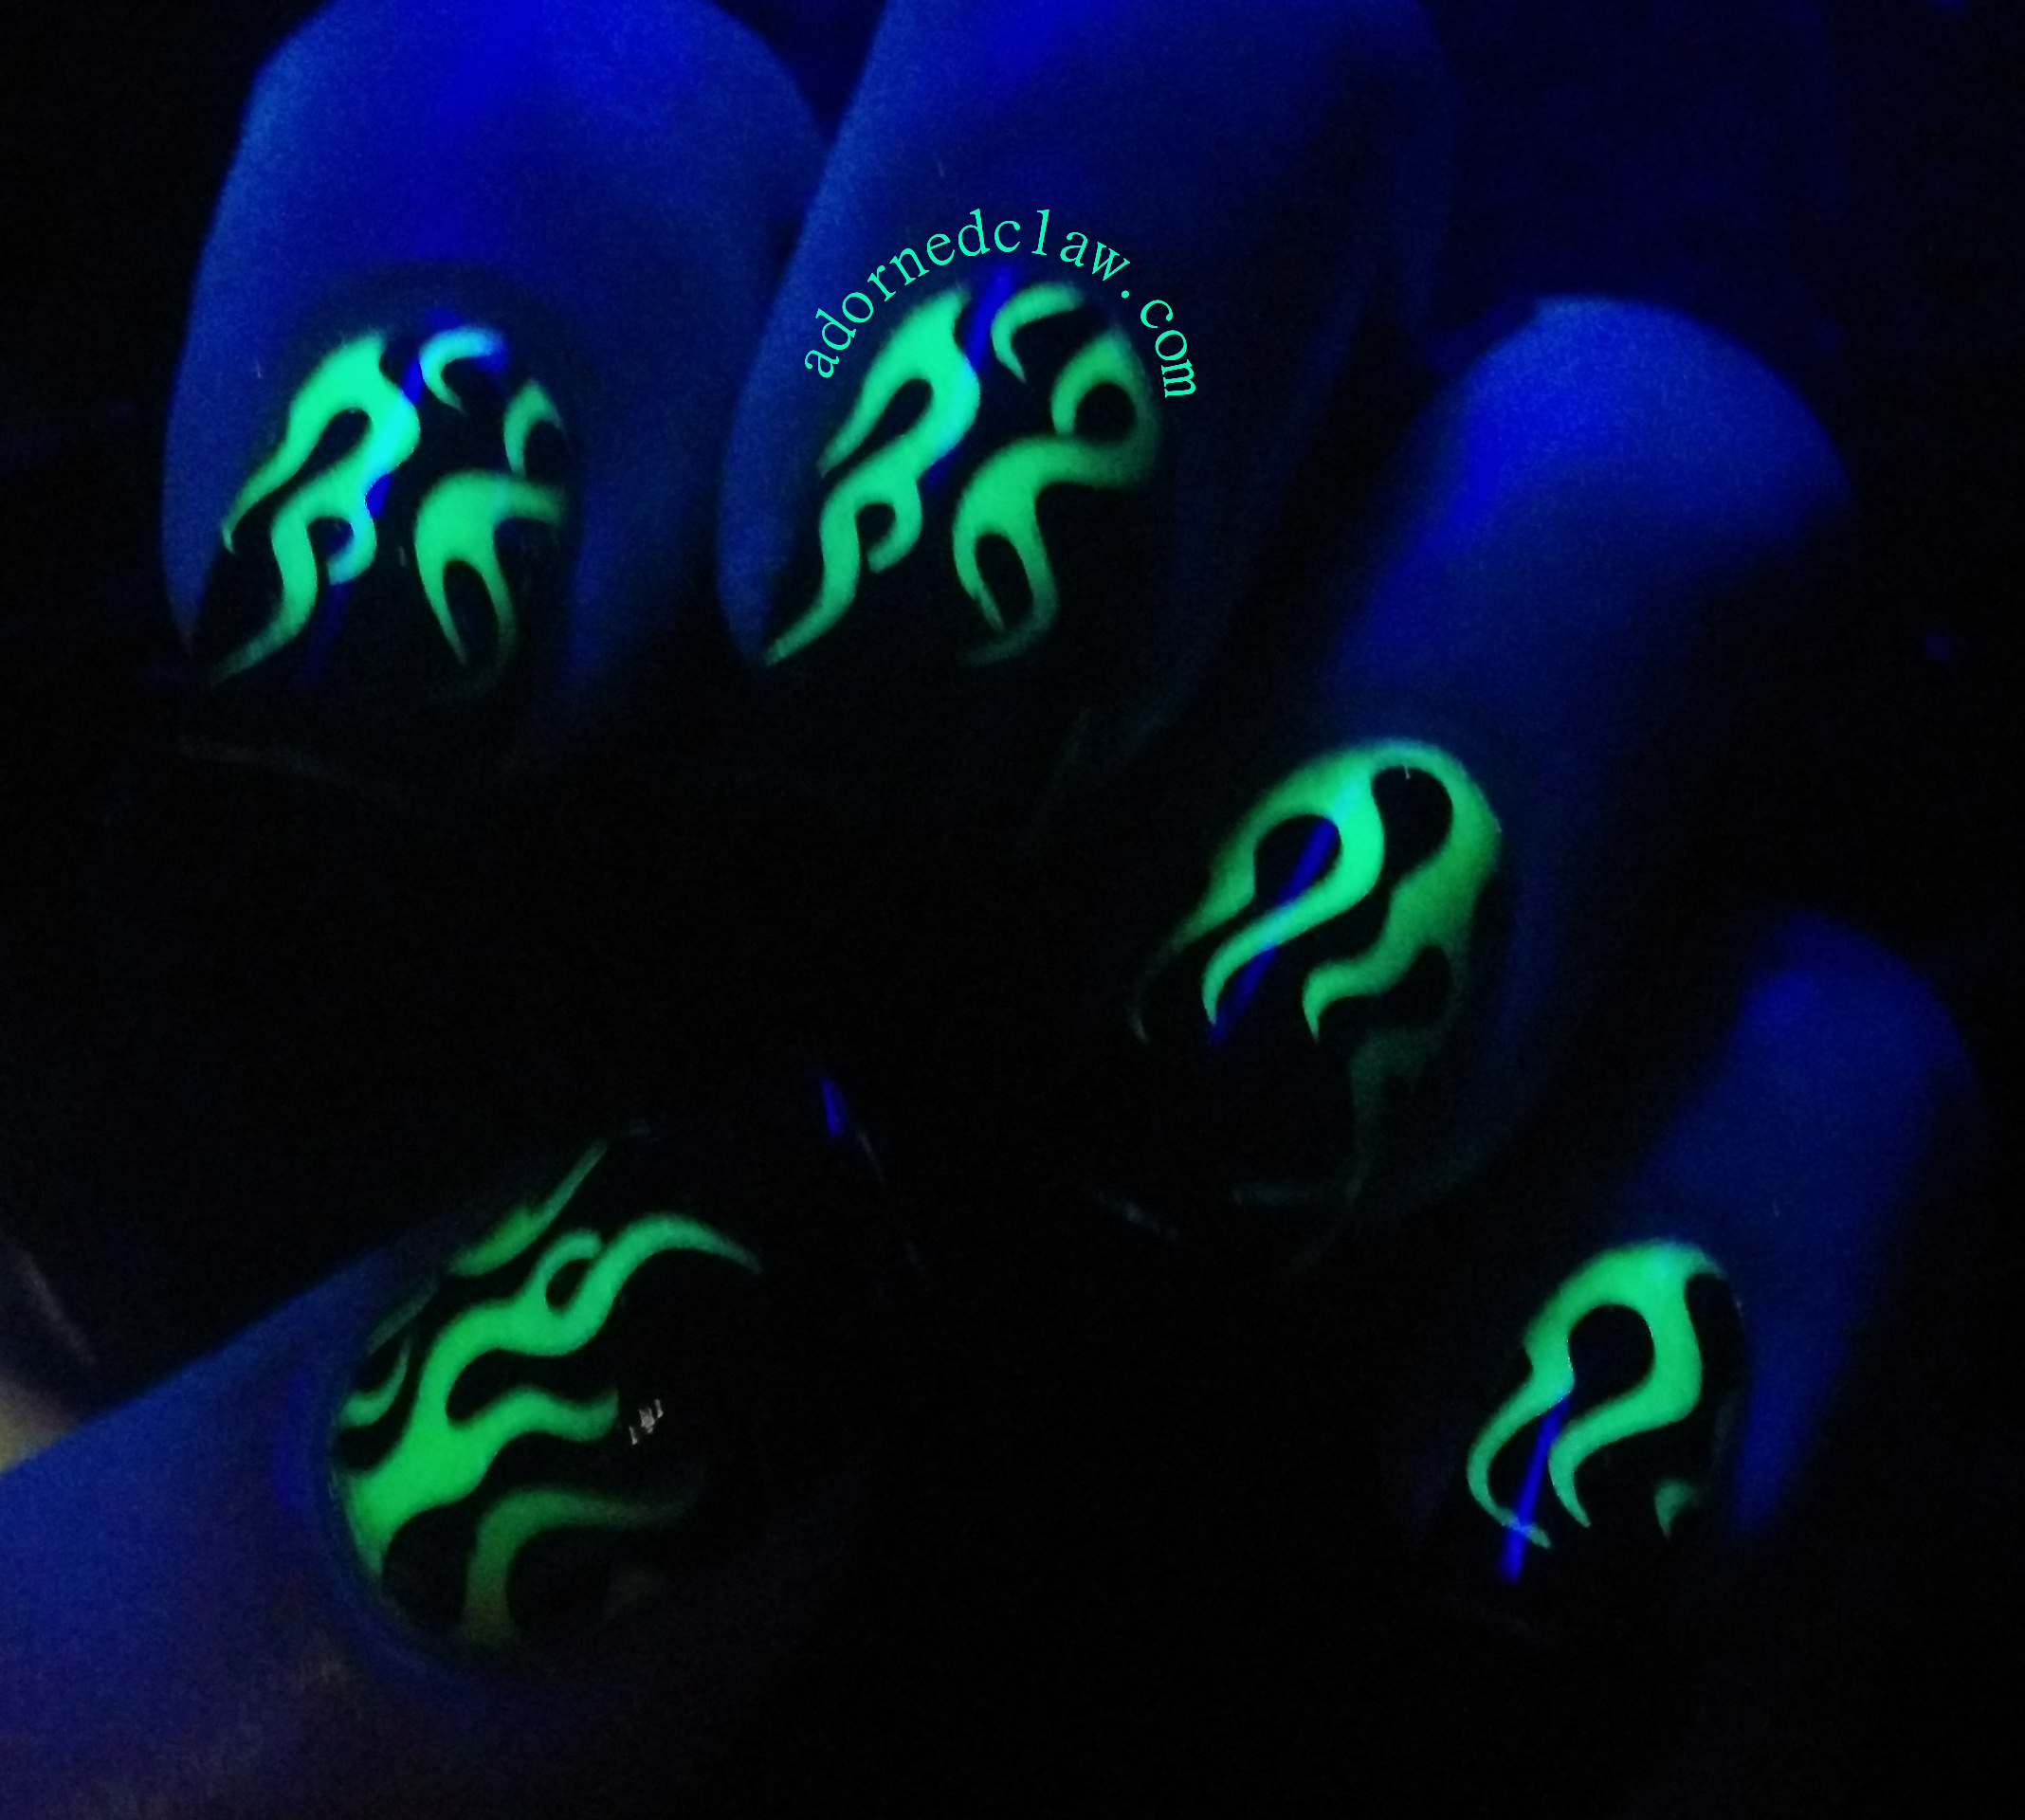
Instead I have some Glow in the Dark Fire nails to share 😀

I really think these would be great for Halloween!
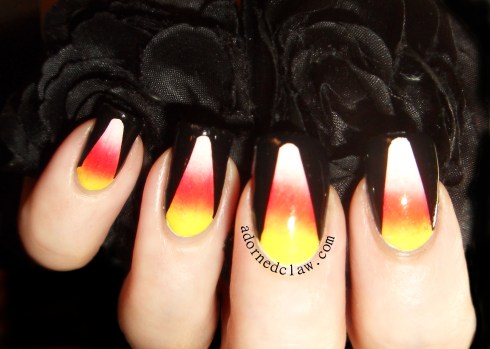
![Flame Nails![/caption]](https://adornedclaw.com/wp-content/uploads/2015/08/glow-in-the-dark-nail-art-mm27-flames-adorned-claw-adornedclaw.jpg?w=490&h=519)
The stuff I used
- Stamping Plate MM27
- Seche Vite
- Hit The Bottle Stamping Polish – Black
- Glow In The Dark Polish Orange and Yellow
- Models Own – Zest a Peel
- Sally Hansen – Lite
I used the Models Own and Sally Hansen Polishes to create a gradient, I think using some white undies would have saved me a lot of layers!
Then I added the glow in the dark polish the ones I used are just cheap Pound shop unbranded ones but they do glow reasonably well, I think using some better quality glowing polish would improve this a lot.
Then when It was dry (this took ages) I used MM27 and Hit The Bottle Stamping Polish to add the flames!
Then a coat of Seche Vite and a bit of a clean up to finish it off.
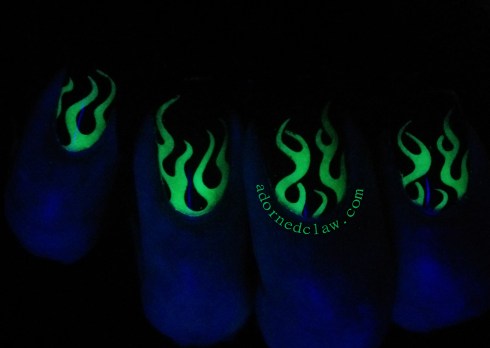
Even if it is orange and yellow this mani makes me really happy! 😀
4 Comments | tags: Black, Glow in the Dark, Halloween, Hit The Bottle Black, Manicure, Messy Mansion MM27, Models Own Zest A Peel, Nail Art, Nail polish, Nail Stamping, Nail Varnish, Orange, Sally Hansen Lite, Yellow | posted in Gradient, Nail Art, Nail Stamping
Hey 😀
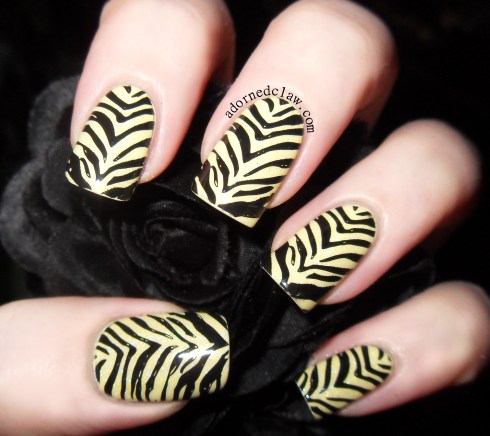
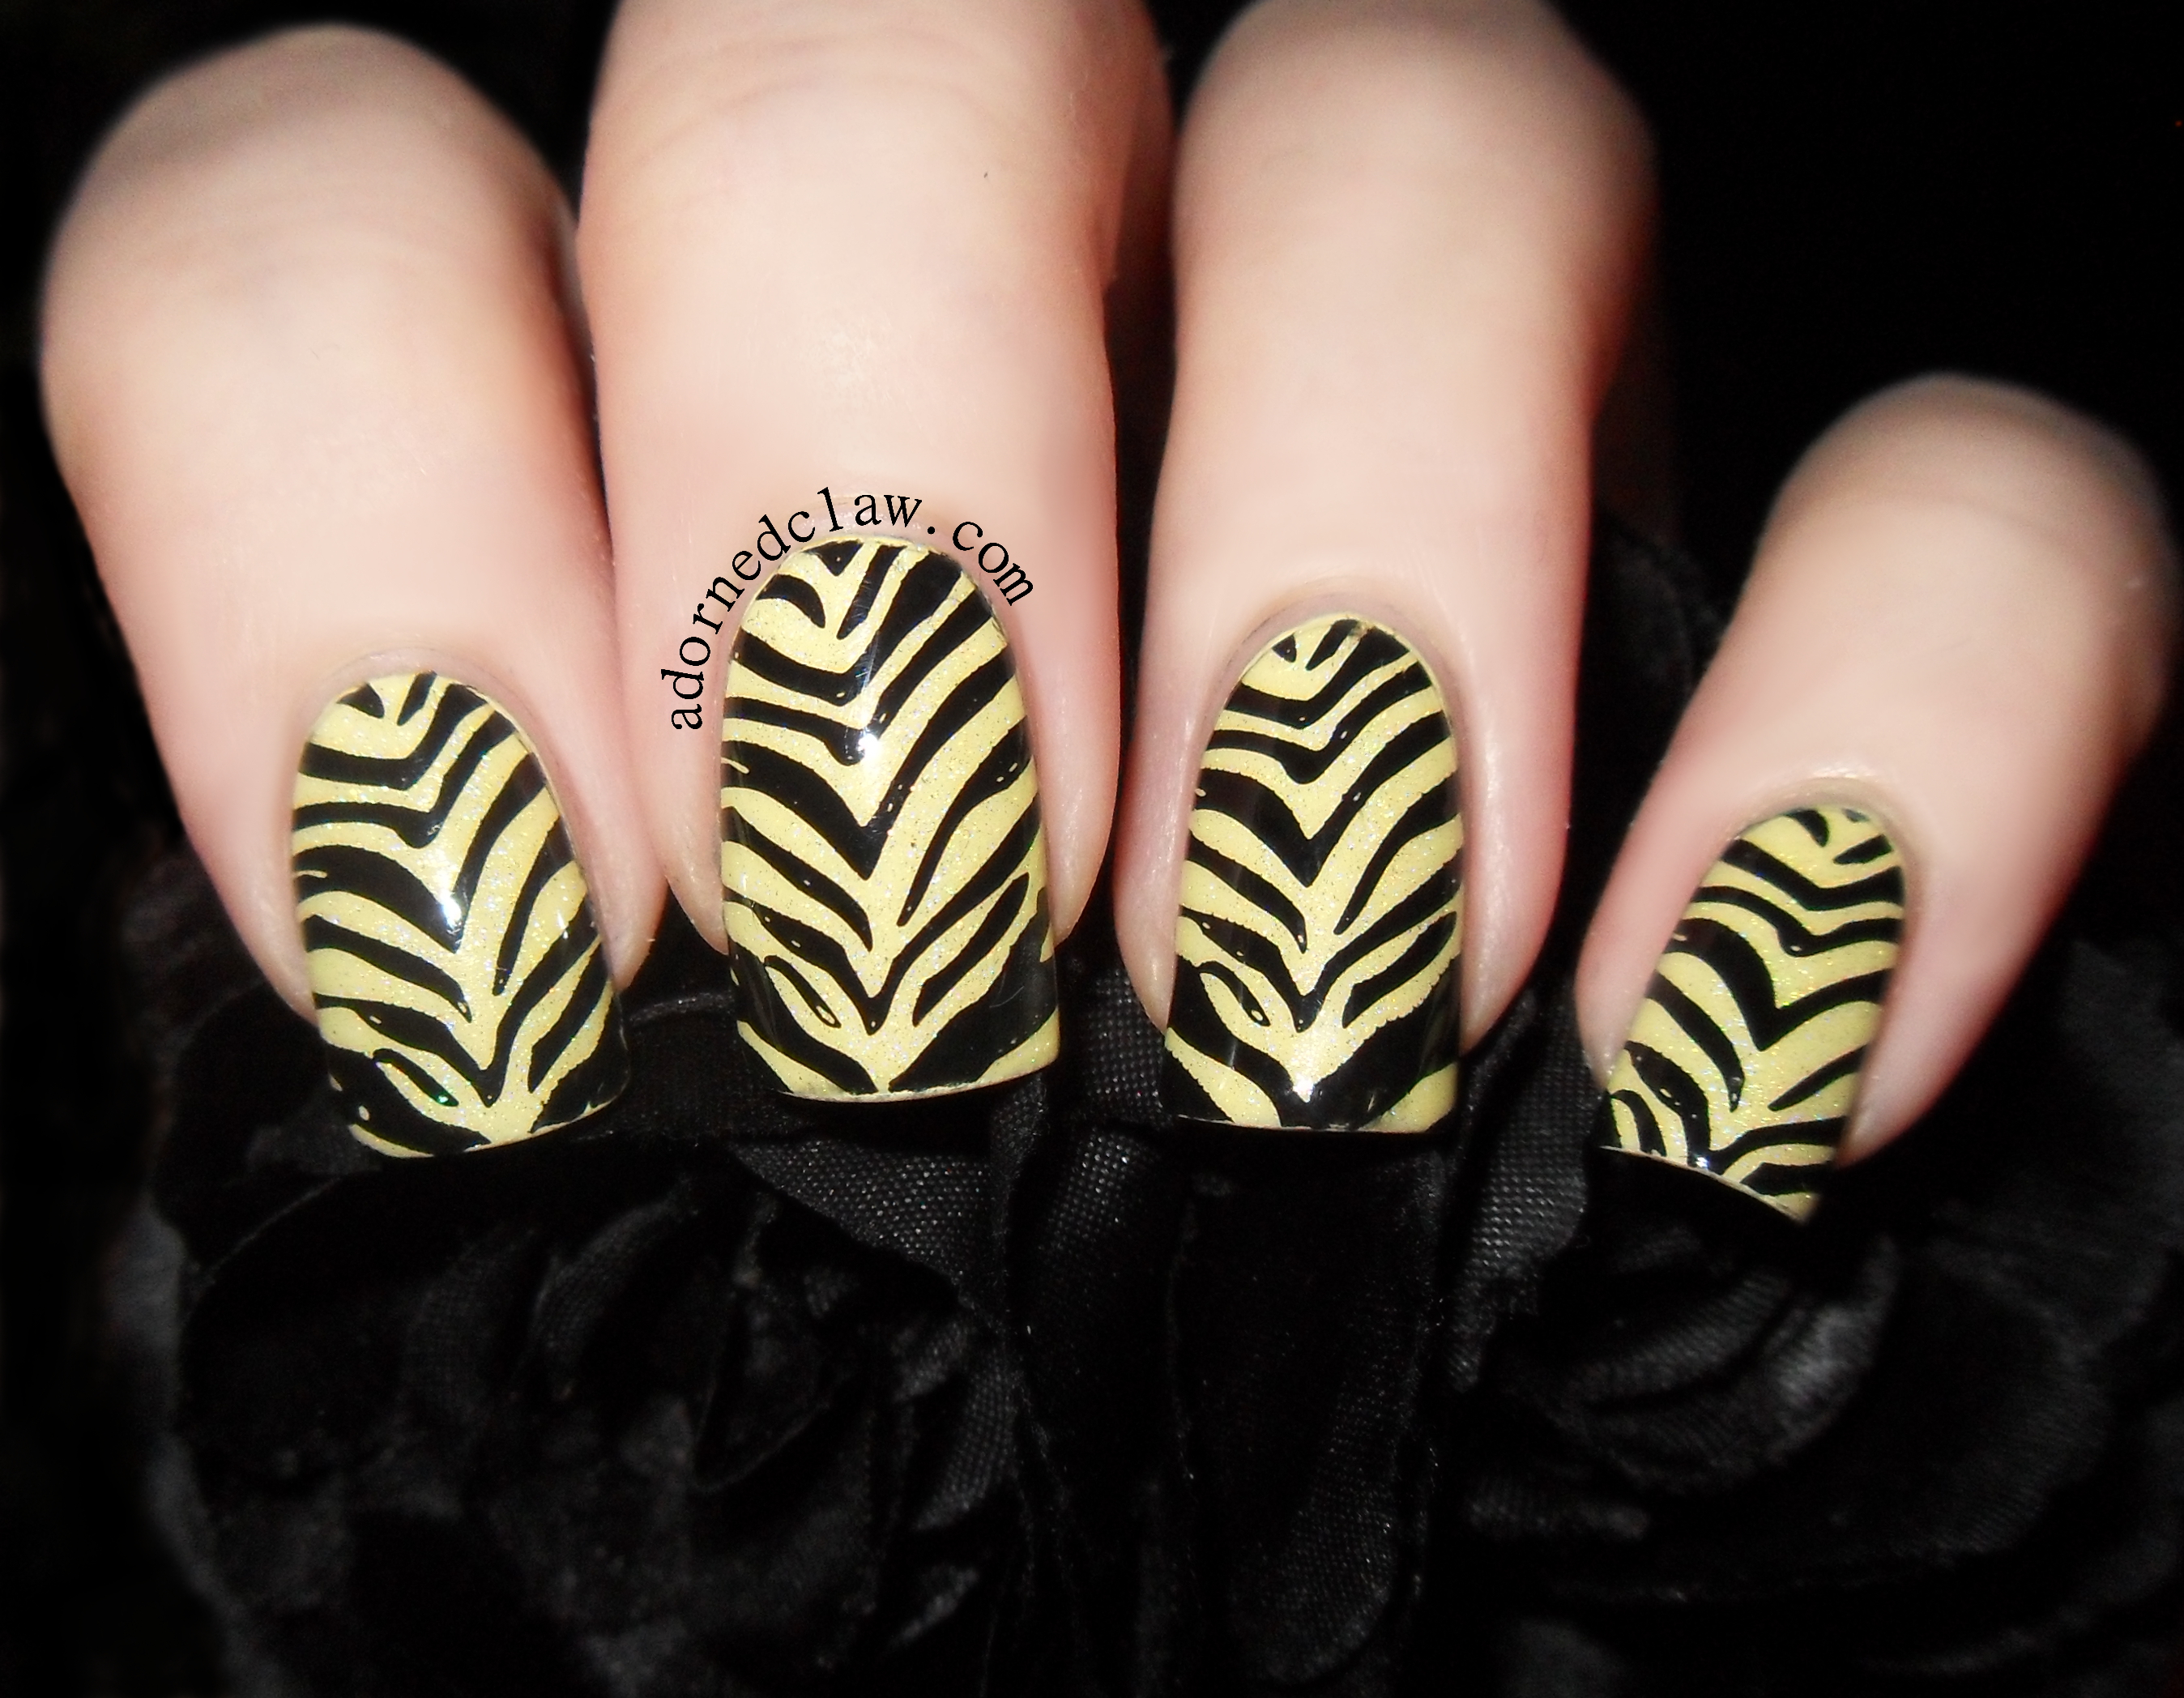
Tiger Stripe
For this weeks Pick and Mix the prompts are Yellow and Wild Animals!

Blow Illamasqua and My Private Rainbow ILNP
Blow from Illamasqua is a pale yellow cream, It’s been in my untried pile for one reason… It’s yellow! the polish itself is really lovely, it’s opaque in two coats and dried quickly to a really glossy finish, but it’s yellow and I just can’t get excited about it 
My ILNP Order arrived today so I had to have a play! I added a thin coat of My Private Rainbow (l+s) over the Illamasqua polish, Oh it’s so pretty! But my camera once again (gah!) decided that it wasn’t going to show the lovely holographic sparkles!
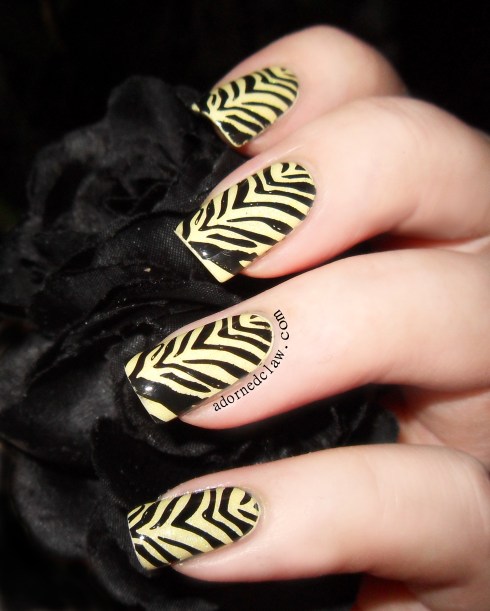
Wild!

2 Comments | tags: 52wpnmc, Illamasqua Blow, ILNP My Private Rainbow, Konad special polish Black, Manicure, Moyou Pro Collection 04 XL, Nail Art, Nail polish, Nail Stamping, Nail Varnish, Tiger Stripe, Yellow | posted in Challenges, Nail Art, Nail Stamping
Hello!
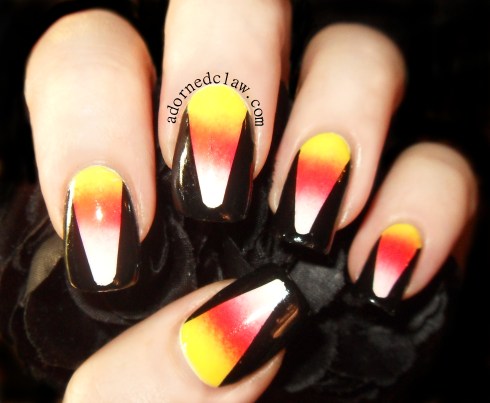
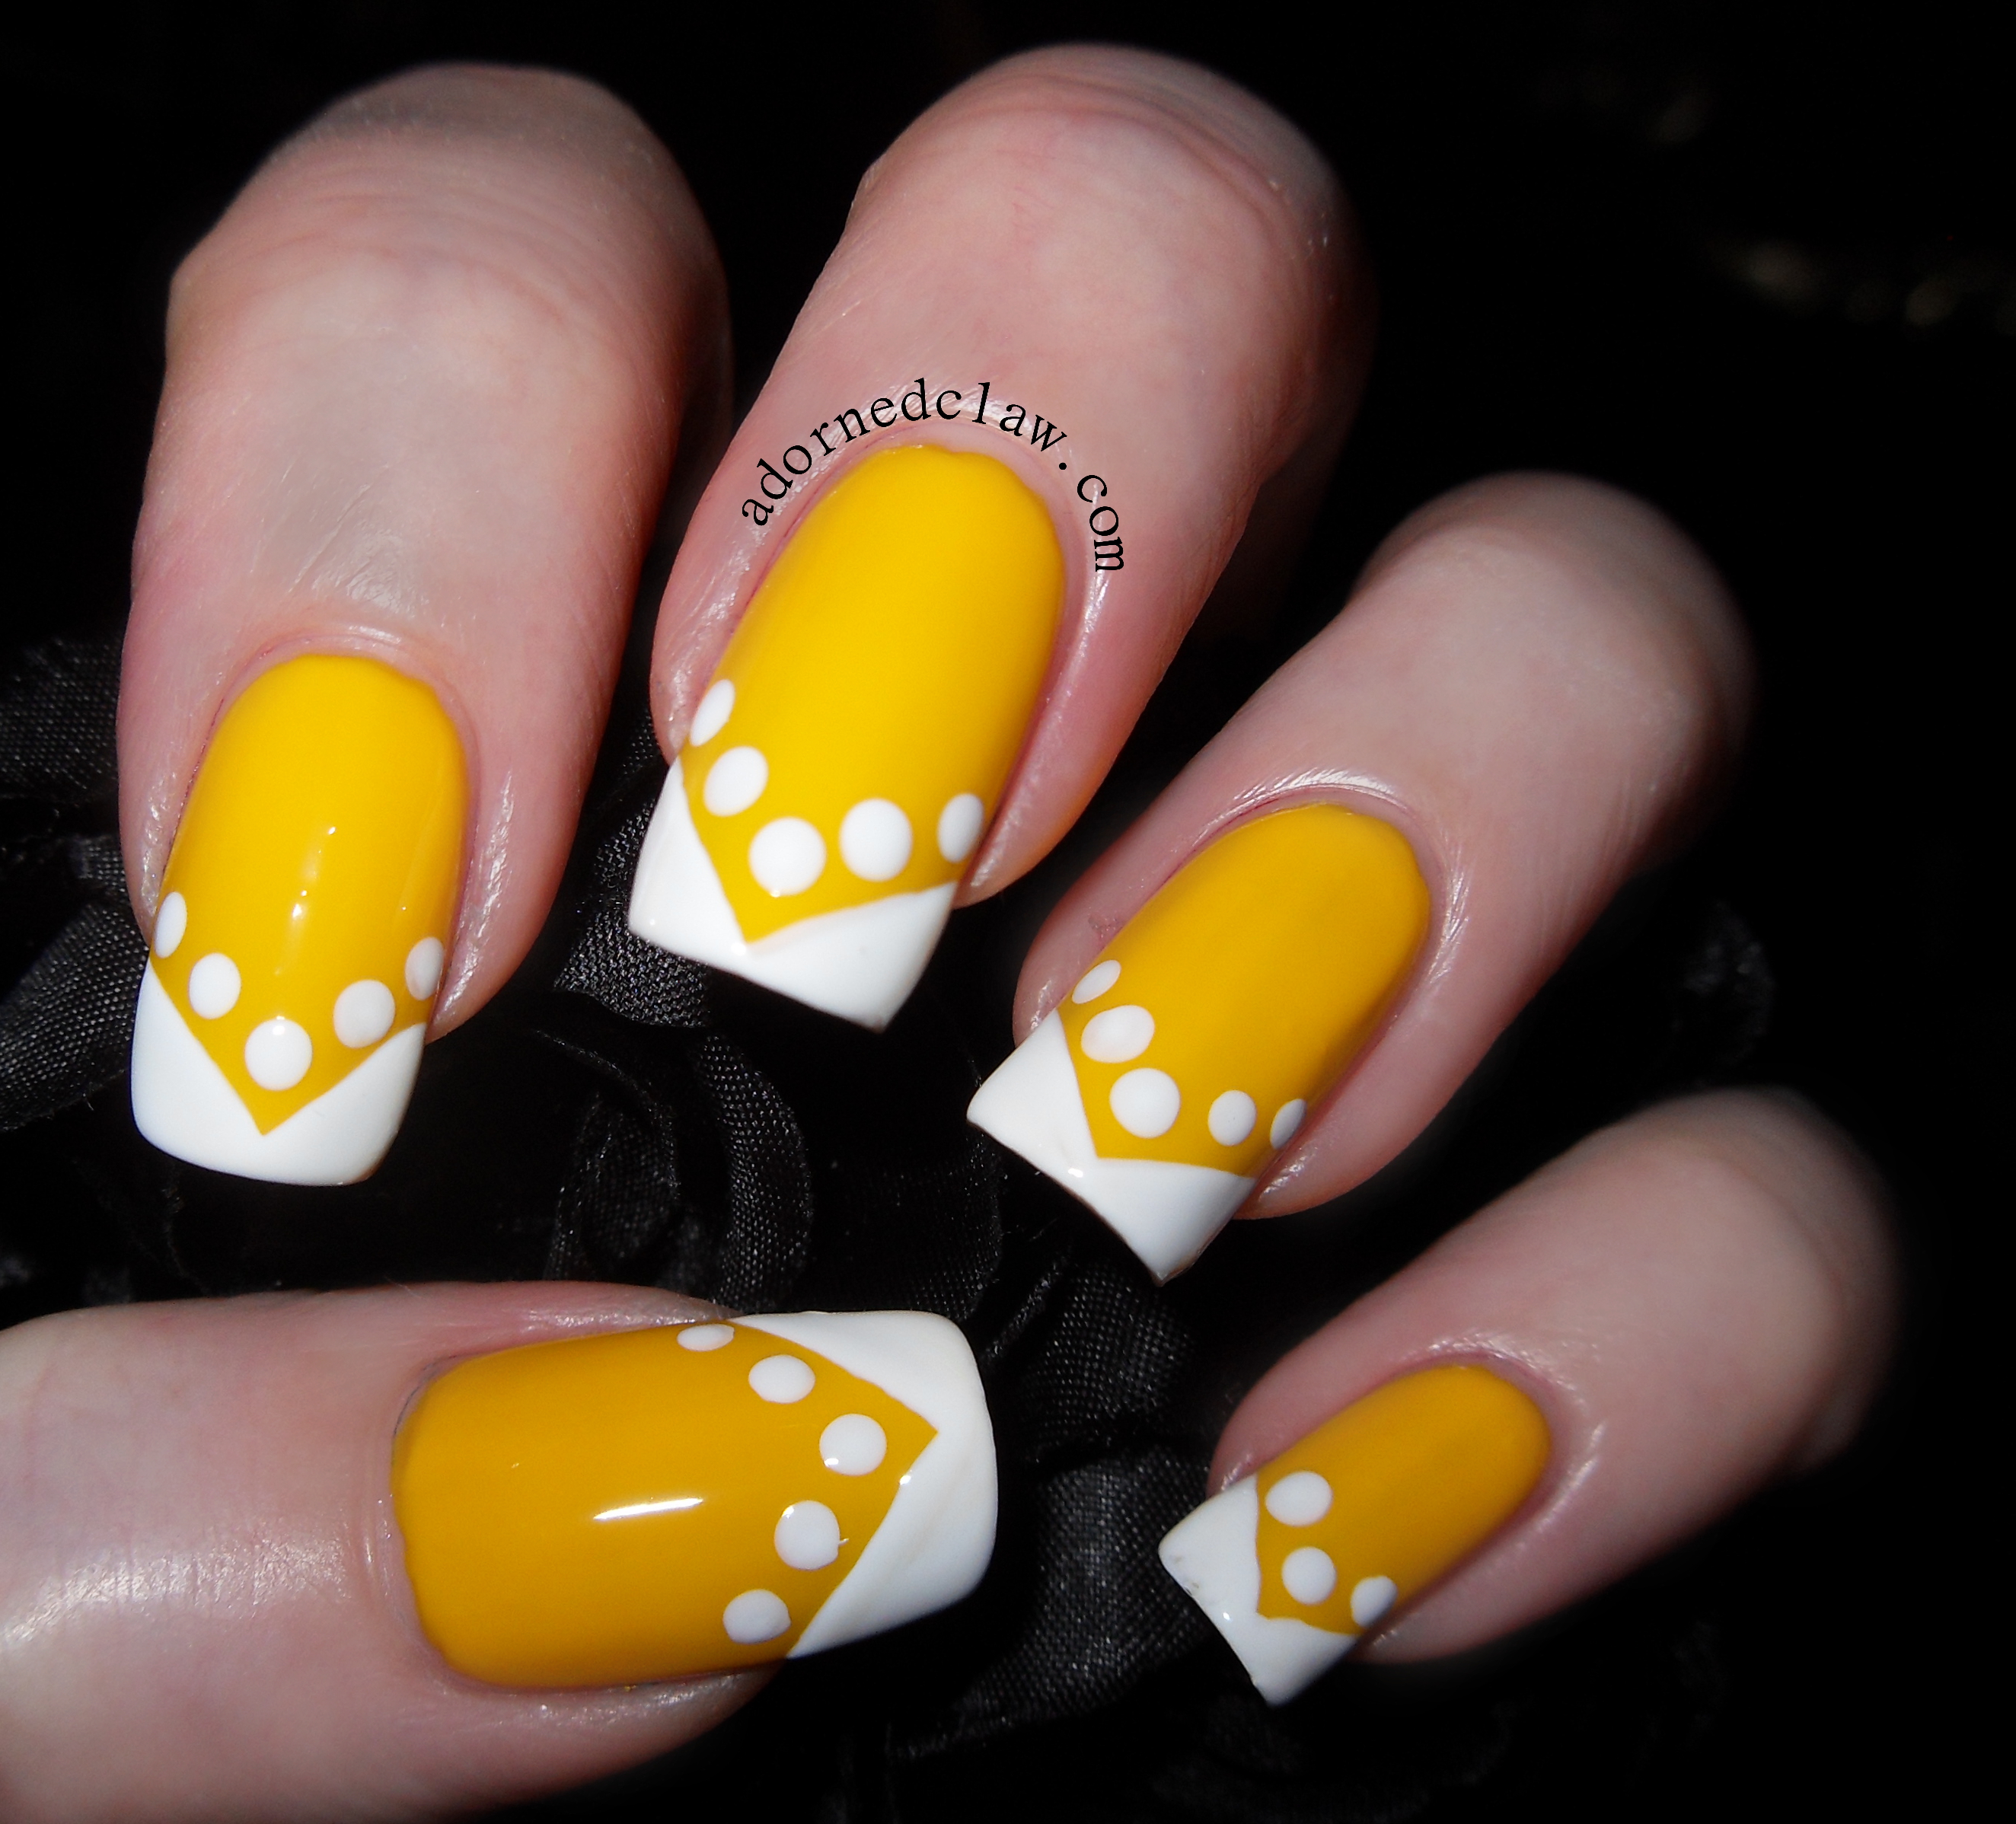
Candy Corn
Today I have candy corn inspired nails!
For this mani I used
- Ivory Skull – Sally Hansen
- Sunny Days – Rimmel
- Liquid Vinyl – Orly
- Black Nail Art Pen – Barry M
- Hot Chilli Pepper – Rimmel
- Out The Door Topcoat
- Nail Tape
- Make Up Sponge
Candy Corn Nails
After my first coat of white polish had dried I used Hot Chilli Pepper, Sunny Days and Ivory Skull to create the gradient, it too ages! It took four layers of sponging to get the colours blended nicely.
The orange polish has a lot more pigment than the yellow so I found (out the hard way, this is my second attempt at this gradient the first was a tragic failure,) that only adding around quarter of the amount of orange polish to the sponge was the only way to stop it from spreading too much.
After my gradient had dried I added a coat of Out The Door… I have to admit I’m starting to miss Seche Vite, but that’s something for another post! When that had dried I used striping tape to create the triangular candy corn shape then carefully painted on a couple of coats of Liquid Vinyl and removed the tape!
I used my trusty Barry M nail art pen to curve the tips of the triangles, then finished it with another layer of top coat.
Candy Corn
This mani also covers one of this weeks prompts for the pick and mix challenge! Which is a three colour gradient, I’ll have to see if I have time to do the other prompt later on this week 🙂

9 Comments | tags: 52wpnmc, Black, Candy Corn, Candy Corn Nails, Halloween, Manicure, Nail Art, Nail polish, Nail Varnish, Orange, Orly Liquid Vinyl, Out The Door Topcoat, Rimmel Hot Chilli Pepper, Rimmel Sunny Days, Sally Hansen Ivory Skull, White, Yellow | posted in Challenges, Gradient, Nail Art

Maybelline Electric Yellow and China Glaze White On White
Here are my yellow nails for day 3 of the 31DC2014 challenge.
for this I started with three coats of Electric Yellow from Maybelline Color Show, then I used White On White from China Glaze for the freehand V shaped french tips, then I added the dots with a medium sized dotting tool!
This was a really quick and easy design to do (which I’m really glad about, I probably should have thought through doing two challenges at the same time!)
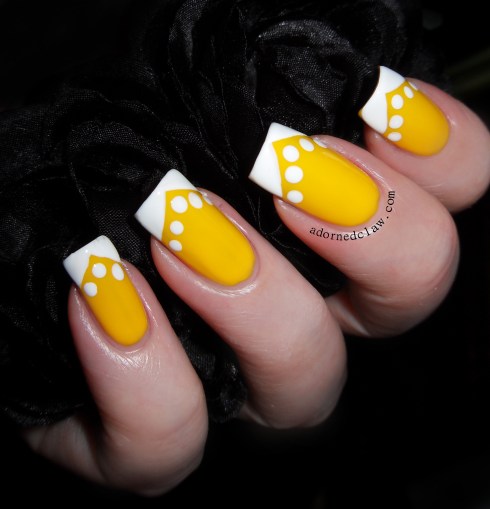
Maybelline Electric Yellow and China Glaze White On White
I still don’t like yellow
2 Comments | tags: 31DC2014, China Glaze White on White, Dots, Dotting Tool, Maybelline Electric Yellow, Nail Art, Nail polish, Nail Varnish, nailpolish, White, Yellow | posted in Challenges, Dots, Nail Art
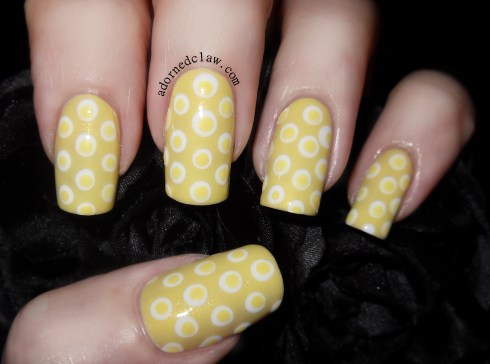
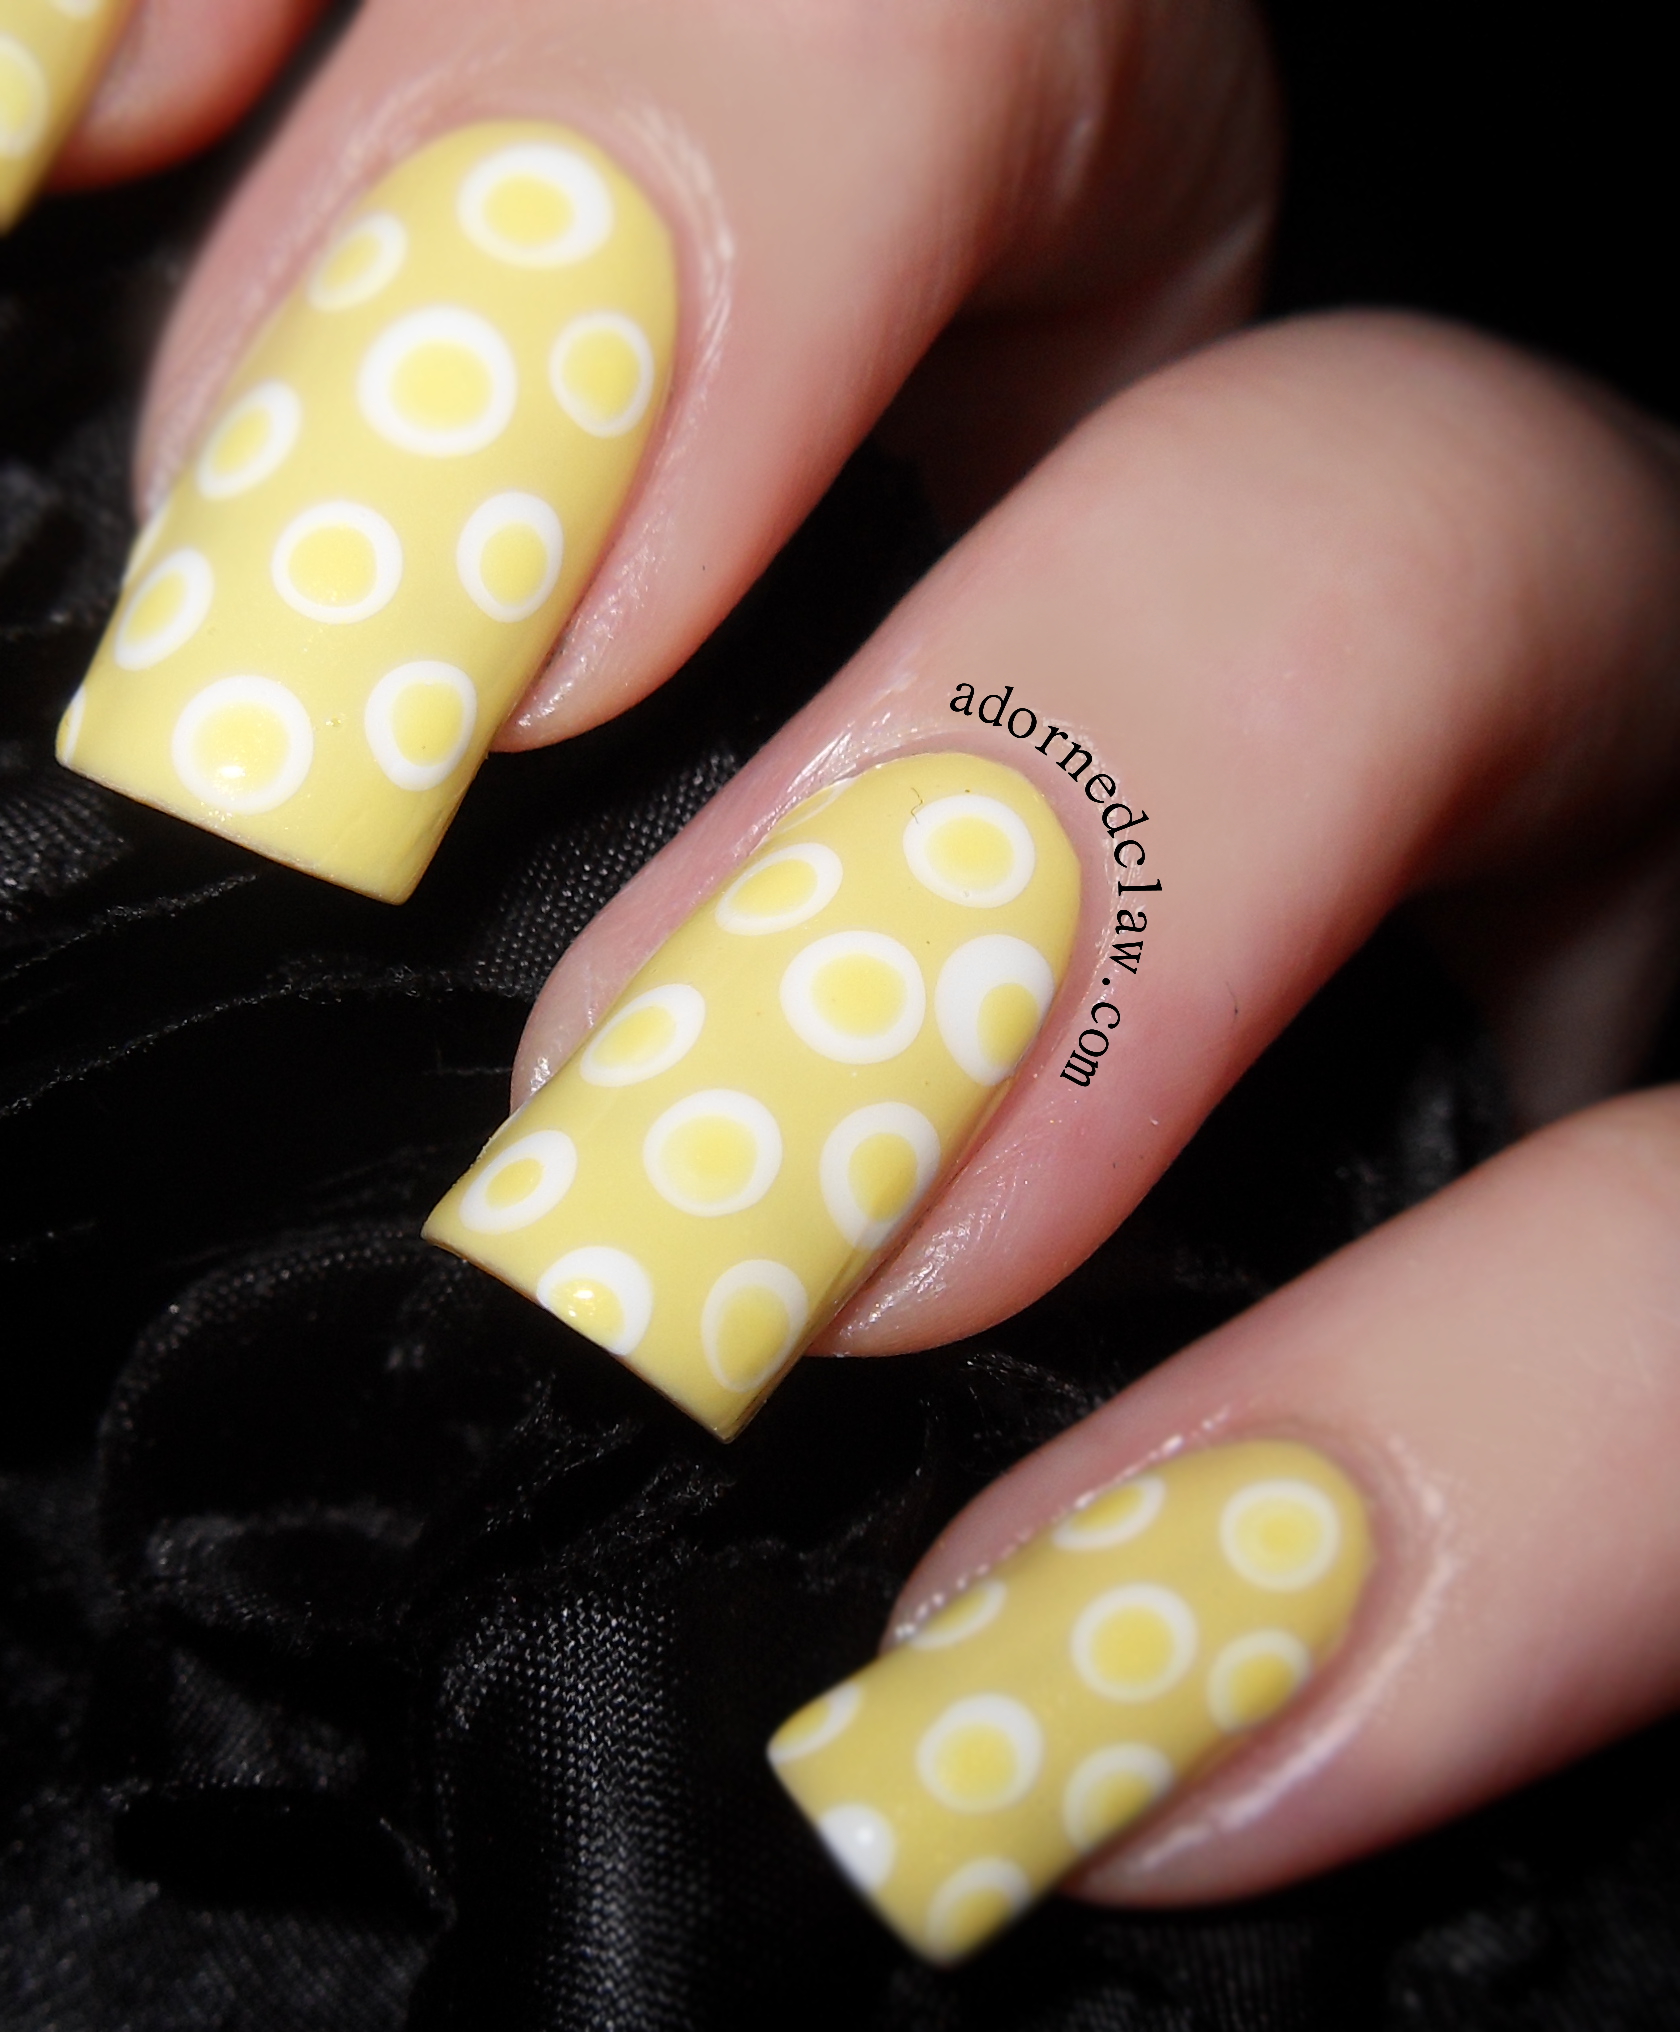
Fried egg nails
Here are my yellow nails for the GOT Polish Challenge! I really don’t like yellow nail polish so this was actually quite difficult for me to come up with anything interesting, I was just staring at the bottles of polish waiting for some kind of inspiration.
I only have 3 bottles of yellow nail polish and one of those is new, so my yellow choices where rather limited, eventually I chose this!

This is a polish I have had for a while, it came free with some cleaning stuff oO (I’m not going to start on gender stereotyping… But Yay for free nail polish lol)

Fried eggs
I don’t like fried eggs, and I don’t like yellow nail polish so it’s a match made in heaven (or hell depending on how you look at it)
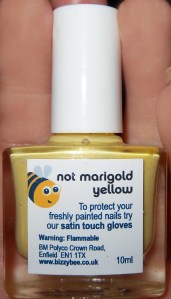
I applied two coats of not marigold yellow then added the egg whites with China Glaze White on White and a large dotting tool, then for the yokes, some more Not Marigold and a medium sized dotting tool!
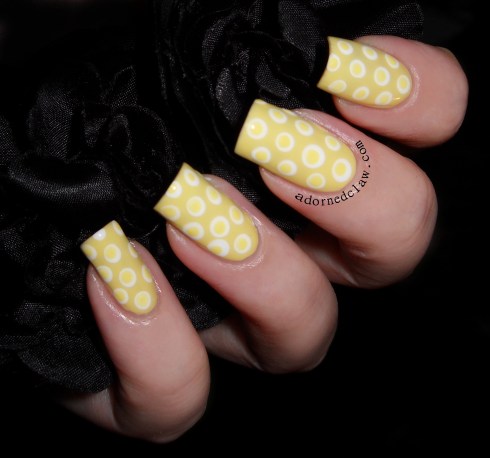
Yellow nails
Don’t forget to have a look at the Pinterest page for the GOT Polish Challenge

I still don’t like yellow!
7 Comments | tags: Bizzybee Not Marigold Yellow, China Glaze White on White, Dots, Dotticure, Dotting Tool, Easter, GOT Polish Challenge, Manicure, Nail Art, Nail polish, Nail Varnish, nailpolish, White, Yellow | posted in Challenges, Dots, Nail Art
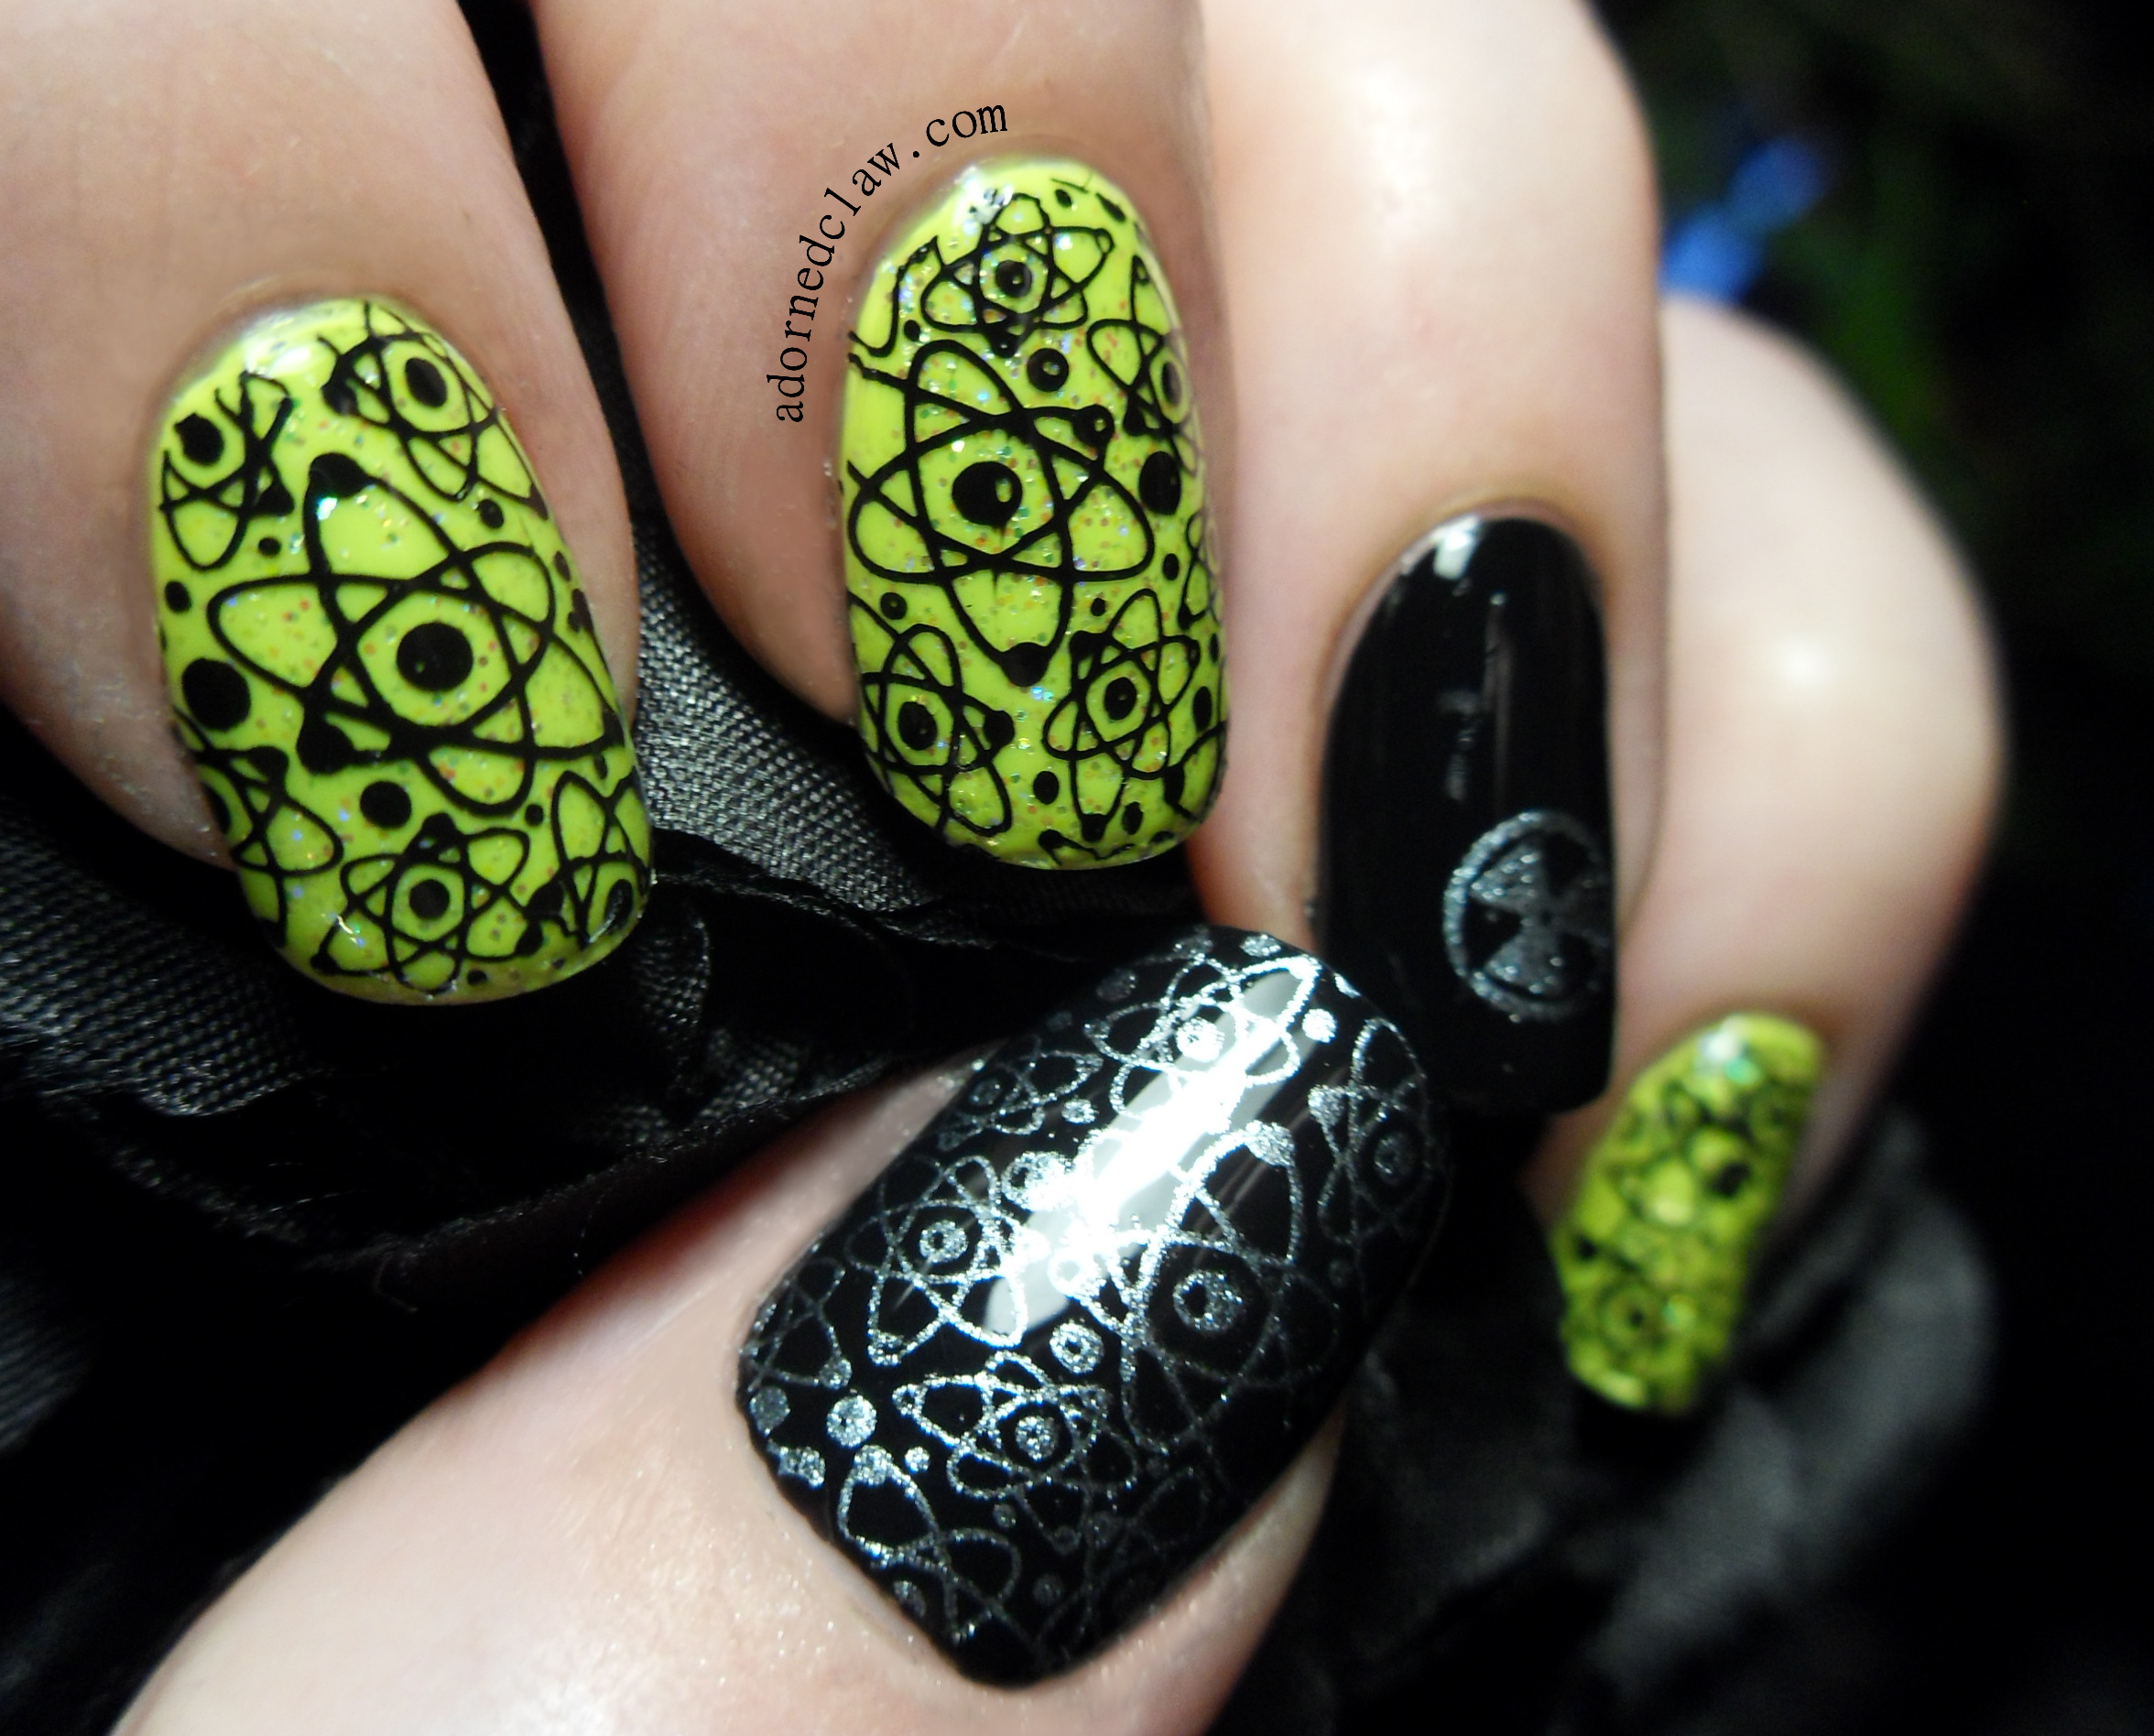
I’m not really going to do science, just some science inspired nails 😀
The plate I used today is from Messy Mansion, its plate MM25 and you can find it right here. 😀
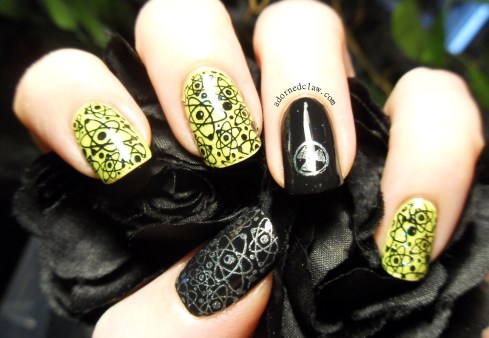
Science Nails!
I started by painting my thumb and ring finger with two coats of Revlon Black Magic
On my other fingers I added a coat of French White from Nina Pro with two coats of Barry M Acid Yellow over the top, I used the coat of white polish to make the yellow really glow!
When that was all dry I topped it off with a coat of Barielle Shades Stardust for some sparkles and then and then a thin layer of topcoat.

Science!
For the stamping I used Barielle Shades night moves for the silver and Konad Special Stamping Polish in Black for the images over the yellow.
Then a coat of color club topcoat to seal in the design, there was a tiny bit of streaking form the konad polish
I didn’t really like this when I had finished it I think it was because of the colour and that I ended up using a lot of polish it felt very thick
But now that I’m looking at the photographs I really like it! 🙂
11 Comments | tags: Barielle Shades Night Moves, Barielle Shades Stardust, Barry M Acid Yellow, Black, Glitter, iridescent, Messy Mansion, Messy Mansion MM25, Nail Art, Nail polish, Nail Stamping, Nail Varnish, nailpolish, Neon, Nina Ultra Pro French White, Revlon Black Magic, silver, Yellow | posted in Nail Art, Nail Stamping


![Flame Nails![/caption]](https://adornedclaw.com/wp-content/uploads/2015/08/glow-in-the-dark-nail-art-mm27-flames-adorned-claw-adornedclaw.jpg)